Garden Bounty

IMG_0583Our little garden continues to grow!  I thought our tomatoes would never get ripe and now suddenly, they are ALL deciding to be ripe.  I’m glad I didn’t put more plants in-I’m the only one that eats tomatoes around here.  I picked those tomatoes and wee eggplants about 2 weeks ago and they were delicious.

IMG_0635

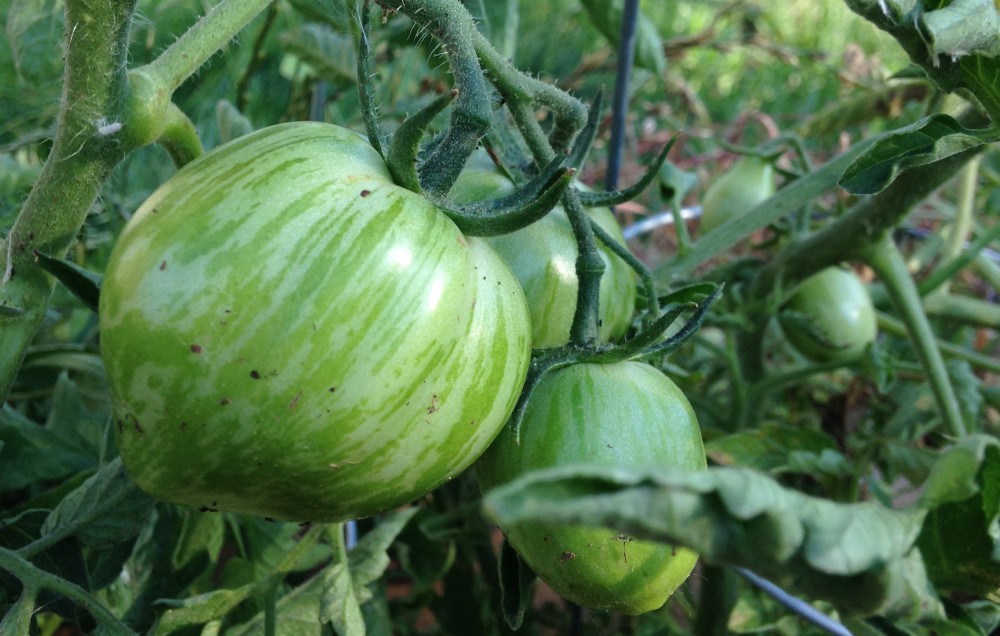
Here’s the tomato crop I’m working with, but I just walked out into the backyard and there’s about 7 more tomatoes I could pick.  I need to start coming up with creative ways to eat tomatoes, although these are pretty perfect with just salt and pepper.

IMG_0628

This monstrosity grew in the garden as well.  I have no clue what kind of squash this is.  It’s a mystery!  I will continue researching to see if I can figure out what kind it is.  All I know is that this is definitely a summer squash because the outside skin is soft, not hard like an acorn or butternut squash.  I ate one a few weeks ago and the inside is soft and has big, white seeds, like a zucchini.  Any squash experts out there?

IMG_0647

We have some yellow crookneck squash growing as well.  More summer squash, since we obviously don’t have enough.  I picked some really fertile plants apparently.

IMG_0649

This is my favorite!  It’s a Jack Be Little pumpkin and it’s so tiny and cute!  I hope it grows to full size before the weather start to get too cold.  I want to set it out on our porch for a little while before we eat it!  It is Autumn here, despite it being almost 80 degrees today.  Can’t complain too much about warm weather though.  I’d take this over snow any day.  Our tree in the front yard thinks it’s time for Fall.  My boots are also waiting to be dusted off and walked through dry leaves again.

IMG_0616

A Garden on the Prairie

IMG_0143

I have always wanted a garden every since I was little.  I planted carrots right into the rocky, sandy soil where I grew up and was delighted when I found spindly, bright carrots growing underneath green feathery fonds.  I think I also tried to grow radishes, but I don’t remember those being as successful.

IMG_0337

Now that I’m an adult (When did that happen…?) and have my own house with a big back yard, I can grow my own garden!  I have set out on this adventure with no real knowledge and I have learned a lot in the process.  All I’ve learned has been from experience and from the single gardening book I bought.  And it’s been a lot of fun.

Here’s a list of things we’ve grown this year so far:

romaine lettuce I bought six romaine plants and every single one died.  I think the hot prairie sun was too much for them.  They like the cooler weather.

spinach

lacinto and curly kale

broccoli

strawberries Some animal, a rabbit, bird or whatever is out here keeps eating our berries. I didn’t get to taste a single one!

IMG_0083 IMG_0085

And this is what’s in progress right now:

squash

pumpkin

egg plant

tomatoes

green bell pepper

cucumber

IMG_0344

Next up will be Autumn vegetables, like beets, garlic, and probably more squash.  It has to cool down a little bit for those though.

It is amazing to me that a little 4×4 raised bed has produced so much life!  When one season’s crop has finished, we pull it up and plant another one.  I thought I was going to have to buy another bed to accommodate all of our plants, but this wee one has been serving us well.  Next year, I will buy another bed and put it under the tree in our yard.  This bed will get more shade and I will plant the more fragile plants there.  But, for now, I’m pretty pleased with my first attempts at gardening.  My younger self would be proud of me.

IMG_0252

Broccoli regrows after you cut out the main floret! Who knew?

This has been my newest interest and occupying my time in my new-ish house.  That and my new dog!


I have not updated this blog since September.  We went through a very traumatic time during our wedding and it took us a while to recover from it.  If any one at all remember the last time I posted, I mentioned that I started eating a gluten free diet to help with my arthritis.  I felt pretty lost with cooking for a while.  All of this is to say that I didn’t blog for a long time and now I feel like I’m ready again.  I hope to continue to update this.  Writing about food makes me happy.  Cheers!

Infused Water: Cucumber/Mint & Strawberry/Mint

DSC03833

The warm weather is finally here!  I think we can safely say that there will be no more snow this season.  If one of those freak June snow storms happen, I’m going to blow my lid though.  Give me flip flops, tank tops and happy hour on the patio.  The snow was really interfering with my gin and tonic drinking and pool side lounging.  When I’m not drinking G&Ts, I’m trying really hard to drink enough water.  I don’t know who said that eight cups of water a day was the magical number, but I find it nearly impossible to drink that much water in one day.  Also, the employee restrooms at work are all the way across the building from my office, and I’m not making 7 trips a day over there.

DSC03842


These delightful infused waters make it easier for me to drink more water though.  I’m not really down with the flavored waters filled with sugar, so I made my own this weekend.  The first one, picture above and below was strawberry mint.

Ingredients:

1/2 cup strawberries, small dice

10 ish mint leaves

3-4 cups water

Method: Combine all the ingredients in the vessel of your choice.  Refridgerate over night or for several hours.


DSC03845


The second infusion I made was cucumber mint.

Ingredients:

1/4 medium cucumber, thinly sliced.

10 ish mint leaves

3-4 cups water

Method:  Combine all ingredients in the vessel of your choice and refrigerate over night or for several hours.


DSC03837


I’d think of these as more of “guidelines” not real recipes.  Like more mint?  Add more!  Don’t like strawberries?  Use a different fruit!  The possibilities are endless.  I definitely drank more water the days I brought these waters with me to work.  The mint adds a super  refreshing taste to the water and the cucumber gives it just a hint cool, mellow flavor.  The strawberries give the water a slightly sweet taste, without all the weird additives in some waters.  Up your water game as the hot seasons approaches and make some fancy, infused water!

Happy Hydrating!  It’s almost Friday people!

Maple Granola

IMG_1451

I’ve been contemplating home made granola for a little while, but all the recipes I’ve seen always call for approximately 1000 ingredients and I usually have none of them.  My other complaint about granola is that it can be too sweet.  I’m looking for something I can feel good eating for breakfast, not dessert.  What I was looking for was a basic recipe that I could modify to fit my kitchen ingredients.  I finally found this formula from Chocolate & Zucchini yesterday.  And so became my first batch of home made granola.

Maple Granola

Ingredients:

3 cups rolled oats

1 & 1/4 cups raw pumpkin seeds

1/2 cup slivered almonds

2 tablespoons whole flax seeds

1 & 1/2 teaspoons ground cinnamon

1/2 teaspoon ground nutmeg

1/2 teaspoon salt

2 tablespoons extra virgin coconut oil

6 tablespoons maple syrup

Directions:

1. Preheat the oven to 400°F.

2. Mix all ingredients together in a large bowl until all the ingredients are uniformly distributed.

3.  Line a 9×13 pan with aluminum foil and spray with pan spray.  Add granola to pan and place in oven.

4.  Stir granola every 10 minutes until it reaches your desired crunchiness.  Mine took roughly 35-40 minutes.

This granola was spot on!  It had the perfect amount of crunch.  I let mine go a little longer in the oven than indicated in the directions because I like mine extra crunchy.  The flax seeds get extra crispy and give the granola great texture.  The maple syrup adds the perfect hint of sweetness but the kicker was that half teaspoon of salt.  Sweet and salt is one of my favorite combinations, and it makes this granola extra addictive.  Take a shot at making some home made granola.  It’s probably one of the easiest things I’ve made!


More Fermenting Adventures: Cabbage

IMG_1380

Gena just posted an awesome tutorial on how to ferment vegetables, which is something I’ve been wanting to try.  I’ve got the kombucha fermenting down, but it’s time to try my hand at some solid food fermentation.  I decided to try making a tiny jar, in case something went wrong.  This jar had green cabbage, two garlic cloves and a few sprinkles of red pepper flakes.  I packed all of this very tightly into a pint jar and filled with a salt water solution.  1/2 a tablespoon of salt to 2 cups of water is the ratio I used.  The rest is easy, just put it a warm place and leave it alone for a few days.

Fermentation station.

Fermentation station.

I fondly refer to this cabinet in our apartment as the “Fermentation Station.”  I’ve been fermenting all of my kombucha in here and now the cabbage.  That’s my giant kombucha mother on the bottom shelf.  My cabbage fermented for about 3 and half days before I liked the way it tasted.  It started bubbling and hissing about 12 hours in, which I found fascinating.  It’s like a science experiment!  Fermenting is pretty cool stuff.

This cabbage is pretty close to sauerkraut, but it probably tastes a little different than what you’re used to with store bought cabbage.  The cabbage stays a little crisper when it ferments this way and it’s also got a stronger taste.  I find the salty, sour and slightly spicy cabbage to be just delightful.  The addition of garlic was also a good choice.  It’s flavor mellows significantly when it’s fermented for a few days and adds some complexity to the flavor of the cabbage.

IMG_1378A few things I noticed while I was fermenting this:

  • I will add less water next time.  The cabbage started to rise as it fermented more and pushed the water level up.  When the fermentation started happening, the bubbling got a little out of control and started leaking out of the jar.
  • Just know that during the fermentation process it may smell slightly strange in your house, especially if it’s small like ours.  My cabbage put off a very strong odor while it was fermenting, which didn’t bother me too much, until the last night it was going.  It was the strongest then.  I’m not sure how you could correct that, maybe wrapping it in a towel to hold the smell in.  Or, if you live in a larger space, it may not be such a problem.

We’re running  a little low on groceries, but after I go shopping today, I’ll have more stuff to eat my cabbage with.  I think my next experiment is going to involve carrots and cumin seeds.  Thanks for the fermenting tutorial, Gena!

Honey Mustard Tempeh

IMG_1329

I love, love tempeh.  It’s my second favorite vegetarian protein to eat.  (Chickpeas will forever be my most favorite plant protein.)  I could eat tempeh directly out of the package, but it really shines when it’s roasted.  Tonight, I coated ours with honey mustard dressing, from Katie’s blog.  The only thing I did differently was add a splash of apple cider vinegar to give it some acid.  I like my dressings pretty acidic.

It was delightful!  The tempeh got golden brown with toasty edges and had the slightest hint of mustard.  I let them go slightly too long in the oven, which turned out to be a happy accident because the bottom was covered a delicious crust.

IMG_1331I ate the tempeh with quinoa and massaged kale salad.  That’s pickled ginger on my plate with the tempeh and quinoa.  It’s part of my plan to incorporate more anti-inflammatory foods into my diet.  The kale salad had the juice of half a lemon, shredded cabbage, black olives, a glug of grapeseed oil, a whole avocado and a generous sprinkle of salt.

IMG_1330


Delicious, healthy and vegetarian.  I’m not completely vegetarian, but I really like eating plant based meals like this.  It makes me feel invincible!


Minestrone Soup (Sort Of)


20130115-133803.jpg

Boulder has been having Arctic conditions for the last week or so. Like, it doesn’t get above 20 degrees all day and when I wake up, it’s 5 degrees. Yes, I am whining, but damn. When the cold seeps through my heaviest coat and my car doesn’t warm up until I’m parking at work, I’d consider that cold worthy of talking about. The obvious solution to this cold is to make soup, like this one. I’m calling it Minestrone, but it’s not really. It has chickpeas in it, and probably a host of other ingredients that aren’t in traditional Minestrone. It’s still delicious, healthy and satisfying, no matter what it’s called! Add some grated cheese and a slice of crusty bread on the side and you’ve got yourself a perfect meal for a frigid night.

20130115-133942.jpg

Minestrone, Sarah Style

Ingredients:

2 tablespoons unflavored oil, like grapeseed or canola.

Half a medium white onion, diced

2 large carrots, diced

5 stalks of celery, diced

5 garlic cloves, minced

2 teaspoons Italian seasoning

I teaspoon anchovy paste

1 28 ounce can diced tomatoes

2-3 cups vegetable broth

1/2 cup kidney beans

1/2 cup garbanzo beans

2 cups whole wheat pasta

Directions:

  • Heat pot over medium heat. Add oil.
  • Add diced onions, carrots, celery and sauté until onions and celery are translucent.
  • Add garlic, anchovy paste and then Italian seasoning. Sauté briefly and then add crushed tomatoes. Fill tomato can roughly half way with water and add to pot.
  • Add 2 cups vegetable broth, and beans. Simmer for 30 to 45 minutes, until the vegetables are soft.
  • Add pasta and cook until pasta is cooked to your liking. Add reserve vegetable broth with pasta if you wish your Minestrone to be more soupy.

Enjoy this tasty soup! It’s rich from the tomatoes and anchovy paste and filled with vegetables to make you feel good after an induglent end to the 2012. I really liked the addition of pasta to this soup; as it cooked, it soaked in the broth and made the pasta taste better than pasta cooked in just water.

The options are endless here too. Use different beans, vegetables, the sky’s the limit! If you want to make this vegetarian, leave out the anchovy paste. Add red pepper flakes if you want it spicy.  Get creative!

Kombucha Two Ways: Pomegranate and Ginger

IMG_1267

I guess it’s been a minute since I lasted blogged.  I just needed a break…and I haven’t been cooking as much recently.  I have been fermenting though!  I am pretty excited about this kombucha that I brewed over the weekend.  This was the closest I have ever gotten to store bought kombucha in regards to flavor.  I’ve been able to achieve the actual fermentation process and the carbonation aspect, but had yet to master a flavor that I really loved.  The photo below is my one of my creation: pomegranate!

IMG_1278I added roughly a quarter of a cup of pomegranate juice to this pint jar and then filled the rest with the kombucha.  Two and half days later, it was ready for drinking.  So, so fizzy and so, so delicious!  The tart and subtly sweet pomegranate juice was the perfect compliment to the kombucha.  It fermented just long enough to have the tang of kombucha that we all know and love, but still retained the taste of the pomegranate.  I was so very excited when I opened this; I love it when my kombucha is super carbonated.  It makes me feel like I’m actually producing something worth the time and effort I put into cultivating and fermenting my brew.

IMG_1265

I also made a ginger kombucha which tasted almost identical to the GT’s Gingerade flavor, if you’re a drinker of that brand.  I added approximately 1 teaspoon of fresh grated ginger to one pint glass of half kombucha and half sugar tea.  (In the second ferment, I usually do a 50/50 ratio of fermented kombucha and sweet tea.  I don’t like mine super sour.)  I may have been a tad overzealous with the ginger, but it was otherwise very good.  The ginger flavor was well incorporated throughout the kombucha, despite it only fermenting for two and half days.  I think next time I make ginger flavored kombucha, I will juice some ginger and use that to flavor the kombucha.  It was a little much to crunch down on fresh ginger pieces.  It’s a work in progress!

If you’re interested in making your own home-brewed kombucha, I wrote a how to post when I finally figured out the best way to brew.  The process is a labor intensive, growing the mother and then first and second ferment, but so worth it.  I find it highly enjoyable though; the flavor experiments are fun!  It’s also a little easier on my wallet because it’s much cheaper to brew your own kombucha.

Half way though the week, here’s to Friday!

Chipotle Stuffed Sweet Potato Skins

20121203-074027.jpg

Although it is 60 degrees in Boulder during the day these days, the season of root vegetables and winter food has begun.  This is my first attempt at making stuffed potato skins and I was pretty pleased with the result.  They’re wholesome, subtley sweet and little smokey from the chipotle salsa.  Perfect for a cool (warm?) Autumn evening.

Ingredients:

4 medium sweet potatoes

1 medium size yellow onion, chopped

2 tablespoon canola oil

1 teaspoon cumin

1 teaspoon chile powder

1/2 teaspoon paprika

1/2 cup frozen carrot/pea mix

1/2 cup frozen corn kernels

1 15 ounce can black beans, drained

1 15 ounce can kidney beans, drained

1-3 tablespoons chipotle salsa, depending on how spicy you like your food.

salt and pepper to taste

Shredded cheddar cheese, any kind.  I used Cabot, Seriously Sharp.

20121203-074018.jpg

Directions:

1. Preheat the oven to 400°F.  When hot, place sweet potatoes inside and bake until easily pierced with a knife.

2. Heat pot at medium heat.  Add oil, and when the oil starts to ripple, add onion.  Sauté until translucent and fragrant.

3.  Add cumin, chile powder and paprika to onions.  Allow oil to cook spices for a few minutes, until they start to smell.  Add the remaining ingredients and let simmer on low heat.  Salt and pepper to taste.

4. Cut cooked sweet potatoes in half and scoop the flesh from the half, being careful to leave the skin whole.  Chop up the flesh of two of the sweet potatoes into bite sized pieces and add it to the bean mixture.

5.  Scoop bean mixture into sweet potato skins, trying to divide the mixture as evenly as possbile between the skins.  Cover with shredded cheese and more salsa and place in the oven.  When the cheese has melted, take them out of the oven and top with desired toppings, sour cream, cilantro, guacamole.

Notes: These can be made vegan by omitting the cheese and using an animal free product for topping.

Use the leftover sweet potato insides for oatmeal the next morning.  I chopped up half of one and added it to mine this morning and it was tasty!

Enjoy!

Achille’s Tendon Update: The Journey Back to Walking

The Front Range. It’s an ok view, right? 😉

My PT told me to start walking around more in two shoes; as in not just around work but actually walking.  I could not be more thrilled!  Running is so deeply engrained in me as a form of mental healthy release and I have missed it terribly.  Walking will have to suffice for now.  Steve and I went and got Georgie and took him to the Dry Creek Trail yesterday.  It’s about a mile loop and flat; no uneven surfaces for me for a while.


WINDOW! I LOVE windows! Let me sit in your lap. I HAVE to be in the front seat to look out the window.

Poor Georgie and Steve and to walk at a snail’s pace with me while we were walking.  I kind of feel like a toddler learning how to walk for the first time.  One little twig or rock on the ground and suddenly I’m unstable and wobbling around.  It’s amazing how three months of not using my foot set me back so far physically.  I couldn’t even make it the whole mile!  We probably did about half of it before I called it quits.

Forcing Steve to take pictures. He has to get ready for engagement and wedding photos, right?

I was tired after our walk and my legs were twitching a little bit, like when you hike all day.  I’ll admit that I’m a little embarrassed and flustered by my lack of physical fitness.  It’s been a weird year with school limiting my time to run and then the Achille’s injury.  I’m just so damn happy to be walking again though.  I haven’t spent that much time outside in the sunshine for what feels like forever.  I’m going to try walking again today, but my poor foot is sore today.

The other thing I am slightly embarrassed about is the size of my left calf.  It atrophied way more that I thought it would, and it still looks small to me.  I’m a pretty short gal, but I’ve got calves that reasonably large.  My surgeon for my foot has commented every time I go in to see him how large my calves are, and how tight they are.  In fact, my scar is longer that most people’s with this injury because of my calf’s tightness.  I won’t go into much more detail to explain why it’s longer; look it up.  It gives me the willies thinking about it.

Nearly healed!

This goes almost all the way to the bottom of my heel.

I will show you some pictures of my scar now though.  It’s healed up enough to the point where I don’t feel gross sharing it on a blog that is mostly about food.  I never really realized how long it is until I put my shoes on yesterday and saw how far it extended.  Now I have glass scars on both of my feet.  When I was younger, I put my right foot through a window and have about six scars all around my heel.  Luckily, I miss my Achille’s tendon in that accident.  My friend said there’s a place that exists where there’s no sharp objects and glass…a mental institution.  Ha ha, I don’t think I’ll have to be committed unless I get into another accident.  Then, I will lose it.

Pretty damn close to the Achille’s.

I have a three day work week this week and then I’m headed home for Thanksgiving.  I haven’t been home since last Christmas and I can’t wait!